Showing posts with label Historical Information. Show all posts

Wednesday, November 23, 2022

Modeling a Grain Elevator - Part 1

Let me be upfront and start this blog entry by saying that I really like the grain industry, especially grain elevators. The grain industry includes a large amount of processes and allows for many modeling possibilities.  I find that switching an elevator, whether large or small, as well as other agricultural businesses is a lot of fun and certainly keeps operators very busy. 

An elevators function is to sort and store grain, and can easily be grown by adding supplemental elevators and other storage containers, drying equipment, piping, etc.  Grain elevators are unique since there are many physical ways that they can be altered yet still perform the same general function.   In essence no two are alike. OK yes I know that probably is not totally true given the hundreds of them that have been built. They can be a very simplistic structure as well as a complicated one. Elevators have a tall conveyor to bring the grain from just below floor level to the very top of the elevator, where it is conveyed into numerous vertical bins. Many current elevators have additional storage bins that were added to accommodate the storage of more grain. In some cases, newer, more modern elevators were built immediately to the side of a smaller grain elevator.  Anytime I'm traveling, I'm always looking through my reference books to see if an elevator may be nearby. 

If you are interested in modeling elevators and related farm structures, check out Tom Johnson's posts on the Model Railroad Hobbyist and the October 2022 issue of Railroad Model Craftsman. Tom has a fantastic bedroom sized layout that depicts a one town area within the mid-west. Beautiful scenery and fantastic detail all centered around agriculture. You look at his scenes and can't imagine the amount of color and detail he has fit into a relatively small space.  Kalmbach Books also published a very good reference book for the grain industry.

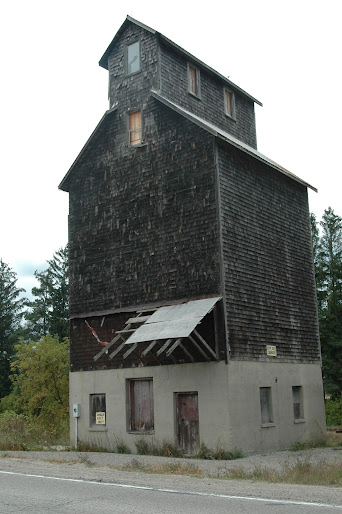
While I used to limit my searches and photos to older, wooden or metal sheathed elevators, I've come to appreciate both the small and concrete behemoths you can find. I think my interest in elevators goes back to my childhood and touring one of the few elevators in Ontario, the now abandoned Shur-Gain elevator in Pontypool, ON. 

My layout has a total of 4 elevators of varying shape, size and function.  Pontypool was an elevator within an easy drive to our summer cottage, and my first experience with an elevator.  I would come to find out it was very typical from a railway perspective, with a single siding built to accommodate 40-ft boxcars and along CP's main line.  It also had a store attached to it.  I would find out later that what set it apart from western province elevators was it's concrete base. It will come as no surprise that this was the first elevator I built, using a Campbell kit as my base. I was moderately pleased with the results, and learned that casting plaster walls was difficult when it came time to join them together as well as join them to a wooden structure. I also did not have the skill to properly create weather, wooden shingles, so I improvised and used a commercially available roofing shingle product as a substitute. The elevator no longer resides on the layout, since I could not find sufficient detailed photos which would allow to build the adjacent store.

Original construction including the store; date unknown

Current condition of the Pontypool elevator
Pontypool Elevator looking east

My next elevator is part of a Freemo module that I purchased from a gentlemen's estate in Michigan. The module consisted of a gas station, residential house, and small country elevator. A lot of items compressed into a 2ftx4ft area. The elevator was a Walthers Farmers Co-Op elevator kit, which I added details to and changed some of the scenery elements.  

I then built a 2ft by 4ft Freemo module to hold the fictional town of Teulonlie, Ontario. The town consists primarily of a small elevator and feed store, as well as a number of small wooden structures that I have built from various kits. It also houses my scratch built train station.  The elevator will accommodate two 40-ft boxcars or one modern cylindrical or 4750 cu ft hopper.


Part 2 of this series will discuss my recent projects, both of which are under construction and be a major scene on the layout.


Wednesday, September 26, 2018

ONR Convention - 2018 @ Kirtland Lake - Saturday

Day 2 of the ONRHT&S convention had us reviewing the morning lineup and trying to determine which trains and locations we could photograph.  Our first train of the day was the southbound train from Englehart to North Bay.  ONR SD75I #2105 was leading a newly repainted SD40-2 #1734.  While some of the group decided to shoot this train at Englehart, Bram Bailey, Mike Robin and I opted to head south to Earlton, where we had previously seen some piles of hay bales.

Southbound train passing by Mini Farm Rd crossing at Earlton. Photo by Ken Stroebel
We chased this train southward, however, he got ahead of us and we watched him beat us to the Hwy 11 crossing at New Liskeard and broke off the chase.

Pacing shot through the farmers fields around Earlton. Photo by Ken Stroebel

We found the ditcher still working at New Liskeard after a brief lunch break at Gillies, however, the sun was mostly behind the clouds and the ditcher would soon be headed back north.

Work train at the New Liskeard station siding. Photo by Ken Stroebel

So it was back to Englehart as we tried to remain one step ahead of the northbound work train.

Work train approximately 1/2 mile east of the Englehart River bridge. Photo by Courtland Saunders


Northbound Work 1733 is captured crossing the Englehart River. Photo by Mike Robin.
ONR 1733 and 1735 at Englehart. Photo by Terry Shwetz.

Catching the work train was our last bit of railfanning for the day, as attendees had an appointment to tour the Museum of Northern History in Kirkland Lake. Located in the former chateau home of successful mine owner Sir Harry Oakes, this museum focuses on Northeastern Ontario including the Kirkland Lake area.  The site’s collection dates from 1907 to the present and includes many objects related to the home as well as mining industry and documents from the area.

Chateau of Sir Harry Oakes

Various mineral and rock specimens; note large scale on top of cabinet

Our evening presentations included a review of mining and smelting operations for Kidd Creek, Rouyn-Noranda, and Sudbury, as well as an overall review and discussion of the geology of the area and how the various ore deposits came to be.  Bill Woods then taught us how to make conifer trees using wire, hemp sisal, spray paint and ground foam.


Thursday, July 5, 2018

Woodchip Gondolas - Part 2


Building the Kit

The resin kits, manufactured by Alpine Railway Shops of Kettleby, Ontario, were marketed as being representative of rolling stock used by CN and BCR for saw mills and paper mills. The gons were to become lettered for the KLR and be used in shuttle service between the Muskoka Timber mill and the Spruce Falls Pulp & Paper mill complex.

I have to make the following disclaimer first off that I'm not a huge fan of resin kits, especially older kits. They seem to lack the lateral stability of their plastic sister kits, and usually seem to have their fair share of air bubbles at the surface as well as excessive flash along the sides. The other problem that I find troublesome is most long surfaces have a serious warp to them. So with that said, I began the build of the three gondolas I had bought years ago.  My first observation was that these looked to be an older resin kit based on the typed xeroxed instructions, and while you could say that there are directions, they are lacking in detail. A Google search of the company name yielded no results, except for a single eBay transaction for a car months ago, so no help there.  

So off to step number 1, which gave me my first puzzle.  The instructions were to use the polystyrene supplied, cut to the same dimensions as the under frame and set them aside. Which dimension...car length or width?  No picture either.  OK, this is going to be a challenge. I had to read ahead to instruction 29, which gave me the clue that this was to become a false floor covering the weight (not supplied).  Come now, did I really need to read the directions?

This lead me to my second discovery, which was not only was the kit missing any sort of weighting material, there actually were no details as to what pieces part were to be supplied.  So after opening each of the kits and finding a lack of consistency between all of the supplied materials, I was off to a good start building without all the parts and clear directions. This was definitely going to require some extra hardware from the excess parts and accumulation box. 

Multiple clamps and a spacer needed to keep the sides from warping and wandering as the CA dries
The sides went together relatively easily, although I found that a full length spacer was needed as the model dried to keep the sides in alignment. Some scrap cardboard cut to size did the trick.

After tackling the sides, it was time to turn my attention to the underside.  Relatively no problems there except for some missing parts.  Good thing I always keep extra parts from other kits.

OK car walls on, underside completed, now it was time to address the weight of the cars.  Spreading some glue on the interior floor, I used some buckshot as my weighting material. A quick check on my scale and it looks like the weighting along the length of the floor will be more than enough to have a compliant car.

Wheels and trucks are on next and the units are almost ready to go to the paint shop.  However, when I got to the point of where the ladders need to be added, I had to stop as I didn't like the ladders which were provided and need to do some catalog shopping to see if I can come up with a suitable substitution.  So they are now on my projects track and will be one of the first items to be addressed when building resumes in the fall. 

Wednesday, August 23, 2017

Modeling a Paper Mill - Part 2 Operations

This is the 2nd part of my paper mill discussion, and I have tried to explain the thoughts that went into designing the mill and more importantly the amount of traffic it could generate and handle.  You may not realize it, but a paper mill makes a great central industry on a layout. The mill gets inbound shipments of chips from lumber mills, chemicals from everywhere, and ships out boxcars of paper (and trailers for the intermodal trains) to all kinds of satellite industries such as paper converters (cut rolls of paper into various size sheets for copiers, notebooks, ect.), corrugated box plants, newspapers, and printers.  Therefore, rail transportation includes:

  • Raw logs to a mill from a log reload offline
  • Chips from the lumber mill to the paper mill
  • Various types of chemicals from multi-sources that are used in the paper manufacturing process
  • Paper from the papermill to a paper converter
  • Various chemical by-products which are shipped to numerous types of industries for their own use
  • Paper sheets from the converter to a printer
  • Coal and other products brought in for power generation
Let me first say that I firmly subscribe to the thought that building a layout by following what the prototype has done is the simplest and most realistic way of achieving your goal. My first mill track plan had some crossover and other trackage that just didn't seem realistic, mostly because it wasn't following what the prototype did.  So it was back to the drawing board.

During the summer of 2001, I had the opportunity to take the family for a trip on the short-lived Timber Train excursion.  Started by the Mattawa Temiscaming Excursion Co., the train was intended to shuttle tourists between Mattawa and Temiscaming, Que. for the day.  The Timber Train used the existing Ottawa Valley RaiLink line, and RaiLink provided the power.  During the stop in Temiscaming, you had the opportunity to walk and shop around the town, or go on a informative tour of the paper mill. Unfortunately, the 7.5 hour journey through the scenery of Ontario and Quebec ultimately did not survive.  When the Timber Train went belly-up, the Adirondack Scenic RR picked up all or most of their cars at bargain-basement prices.  Engines went back into RaiLink service.  But for me, the tour of the paper mill was very much worth the entire trip. Informative from both how paper and pulp is made, but also informative from a railroad operations standpoint.  No wonder the train staff was looking at me kinda funny as the train was entering the mill.  I was the only one at the window trying to photograph every building and track in front of me.  Ultimately armed with knowledge gained from trip as well as observing the other mills I discussed in Part 1, I would pattern the Spruce Creek Pulp & Paper mill after these operations as much as I could.


So let's start with a discussion with what the Spruce Creek plant produces and how it actually is made from the various raw materials which are needed. Similar to the Temiscaming mill, I modeled operations to include three main mills that manufacture different forest products, including specialty cellulose, high-yield-pulp and coated bleached board (containerboard) as well as a chemical products facility.   The chemical products division produces a variety of products made from spent sulphite liquor (primarily alcohol, resin or lignin based).  


Tembec's Temiscaming, PQ operation
Temiscaming - Chemical Division in background; bark & chip storage buildings in foreground

Temiscaming Specialty Cellulose Mill
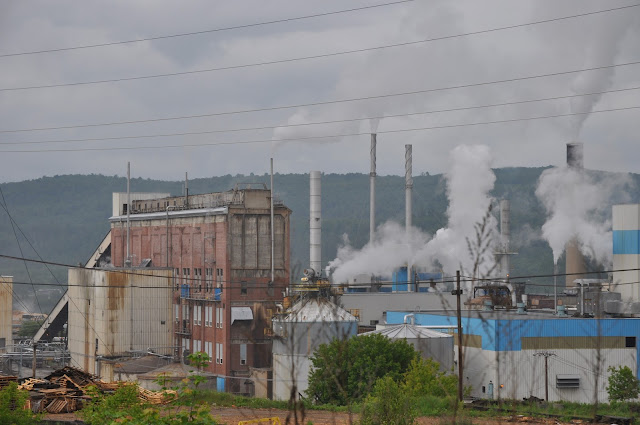
It goes without saying that modeling four operating plants takes up a large amount of space, which typically is not available with a model railroad regardless of which scale you're modeling.  However, I have used photos from the Kapuskasing and Temiscaming mills as backdrop, which is how I incorporate each of the mills.    

As I mentioned in Part 1, my Spruce Creek Pulp and Paper Mill is located on two 2’ by 6’ modules in the center of the room.  Starting from the left side, my buildings include a power plant, the pulp mill, alcohol plant, acid building, kaolin building, specialty cellulose mill, board mill and the warehouse.


High Yield Pulp - the pulp mill is a manufacturing facility that converts wood chips or other plant fibre source into a thick fibre board which can be shipped to a paper mill for further processing. Pulp can be manufactured using mechanical, semi-chemical or fully chemical methods (kraft and sulfite processes). The finished product may be either bleached or non-bleached, depending on the customer requirements.  In our mill, kraft pulp is produced using softwood pulp, while the "B" mill can produce either softwood or hardwood pulp.  Similar to the Boardmill, final products are shipped via both rail and truck.  The Kraft mill also produces large amounts of lignin liquor, a byproduct of the digestion process. This material can be shipped out in tankers, dried, or fed to other bacterias to make yeast.  The Kraft mill also uses other chemicals such as sodium hydroxide (caustic soda) and sulfuric acid. Kaolin (slurry form) is brought in to make glossy paper. Kaolin is often supplemented by calcium carbonate (lime) slurry and titanium dioxide.


The Chemical plant consists of products which are made from the spent sulphite liquor generated within the facility.  The plant can be divided into an alcohol division, resin division and lignin division.  Most of this operation takes place within numerous tanks situated within three central buildings.  Due to their relative size, I chose to model only the fronts of the buildings and blended the building into the photo backdrop.


Refined from wood pulp, specialty cellulose is used in a range of applications across many industries – cosmetics, pharmaceuticals, personal care, food, coatings, electronics and energy.  Specialty cellulose is manufactured in both rolls and bales.  Similar to the chemical plant, this area was modeled using only the front of the building set against the photo backdrop.


The Boardmill Division produces high quality paper and manufactures newsprint for publishers of daily newspapers and commercial printers, as well as controlled bulk paper for mass-market paperback book publishers and commercial printers.  Coated bleach board is a product used for a broad range of commercial printing, publishing and packaging applications.  Newsprint production uses wood fibre obtained from four separate sources, including thermomechanical pulp (TMP), recycled pulp, groundwood pulp and kraft pulp. 


Part 3 will look at the rail operations inside the mill.


Wednesday, December 30, 2015

Historical Sources of Information - NE Ohio

One of the tremendous resources offered by the Internet is the wide variety of historical information that it contains.  From searching for historical photos of a building, to finding old fire insurance maps showing building and property layouts to listings of businesses in city directories, the possibilities seem to be endless.  I would like to share with you a website that I found while searching for historical maps of the downtown Cleveland area.   Stephen Titchenal maintains a website which provides high-resolution digital images of historic maps and documents, many of which also can be seen in places such as the Cleveland Public Library. The website has a lot to offer anyone interested in the history of Cleveland and northeastern Ohio, as well as Ohio railroading in general. Included in the website are many straight line track diagrams (Grade Profiles), locomotive, car, and building diagrams, railroad property/valuation maps, timetables, historical topographic maps, and a small assortment of pictures (taken from the Cleveland Press and Cleveland State University collections). Most of the items found on his site will be helpful in understanding and modeling specific railroad lines in and around Cleveland, as well as northeastern Ohio. For example, he has posted timetables (both employee as well as passenger) for various railroads including the New York Central, Pennsylvania, and the Pittsburgh & Lake Erie. Track diagrams include the Baltimore & Ohio, CCC&StL system track chart, Conrail, N&W, Nickel Plate, Penn Central, PRR, and W&LE.

The site also offers such unique items as the 1884 coal field maps of Ohio, the New York Central System ICC Valuation Map Indexes as well as valuation maps of the NKP.  Many of the digital images on the site have high resolution versions, however you will need to download and install a free DjVu browser plug-in. DjVu provides greater detail and faster viewing than typical web-based images.

The website can be found at: http://www.railsandtrails.com/default.htm