Sunday, April 23, 2023

Origin of the Quay Sawmill

This story starts approximately 6 months ago, when an elderly gentleman reached out to the LENS group for some help with his layout. George had started a bedroom layout years before, but had abandoned any work during the two years of Covid exposure. He was afraid that some of his layout building and modeling skills had lapsed during that period and was looking for some folks who could get him started again and offer ideas for the layout.

The layout was a steam based theme, set roughly in the forested areas of Quebec and Ontario. His major business would be a saw mill, which was already built years before. While he had accumulated many kits for building his fictional town, that sat waiting in their boxes. Part of the layout had DCC installed, and other parts of the benchwork were started and initial wiring. The last wall was framed in, but no real top or topography yet installed. The first task at hand was to review the wiring and get a train running through at least part of the tracked area. Our first work session involved quite a bit of cleaning and clearing. Our 2nd session was spent tracing the wiring, getting Tortoise switches back in order, and a little bit of mountain building.

Unfortunately the story takes a sad turn, for after the holidays we had planned another work session but George was not feeling well. After several weeks, he entered hospice care and unfortunately never get home to see his layout again. As no one in the family was interested in model railroading, I worked with the family to tear it down and clear out the room. The family wanted to see the layout live on, even if it was to be scattered to the winds. So my good friend and recent retiree Frank and I took several weekends to clean everything up. I'm happy to say that the layout frame, spare track, scenery materials and other items went to help Frank with his new layout that he has been designing. He plans to model the Big 4 over at the Berea Tower.  Other materials were split between members of the LENS group for their own modules or home layouts. I was fortunate enough to be able to save the saw mill and lots of trees for my own Ontario themed layout.

The new sawmill on the layout will become Quay Sawmill in honor of George. While I haven't quite figured out the trackplan or how all of the buildings will fit, I have the workings of a plan and have been experimenting. It will be fit into a 6-foot module, which I had previously built to a park and baseball field, as well as Commonwealth Plywood. For now, the Comm Plywood buildings have been boxed for storage. I may need to add about 24-30 inches onto this module, in order to fit a small log pond. I also plan to modernize the operations to fit into the 70's, which means the tracks for pushing loaded log buggies will disappear. However, the general theme of the operation will sat the same.  So stay tuned as the progress of the sawmill is documented.
Original BTC Sawmill


Wednesday, November 23, 2022

Modeling a Grain Elevator - Part 1

Let me be upfront and start this blog entry by saying that I really like the grain industry, especially grain elevators. The grain industry includes a large amount of processes and allows for many modeling possibilities.  I find that switching an elevator, whether large or small, as well as other agricultural businesses is a lot of fun and certainly keeps operators very busy. 

An elevators function is to sort and store grain, and can easily be grown by adding supplemental elevators and other storage containers, drying equipment, piping, etc.  Grain elevators are unique since there are many physical ways that they can be altered yet still perform the same general function.   In essence no two are alike. OK yes I know that probably is not totally true given the hundreds of them that have been built. They can be a very simplistic structure as well as a complicated one. Elevators have a tall conveyor to bring the grain from just below floor level to the very top of the elevator, where it is conveyed into numerous vertical bins. Many current elevators have additional storage bins that were added to accommodate the storage of more grain. In some cases, newer, more modern elevators were built immediately to the side of a smaller grain elevator.  Anytime I'm traveling, I'm always looking through my reference books to see if an elevator may be nearby. 

If you are interested in modeling elevators and related farm structures, check out Tom Johnson's posts on the Model Railroad Hobbyist and the October 2022 issue of Railroad Model Craftsman. Tom has a fantastic bedroom sized layout that depicts a one town area within the mid-west. Beautiful scenery and fantastic detail all centered around agriculture. You look at his scenes and can't imagine the amount of color and detail he has fit into a relatively small space.  Kalmbach Books also published a very good reference book for the grain industry.

While I used to limit my searches and photos to older, wooden or metal sheathed elevators, I've come to appreciate both the small and concrete behemoths you can find. I think my interest in elevators goes back to my childhood and touring one of the few elevators in Ontario, the now abandoned Shur-Gain elevator in Pontypool, ON. 

My layout has a total of 4 elevators of varying shape, size and function.  Pontypool was an elevator within an easy drive to our summer cottage, and my first experience with an elevator.  I would come to find out it was very typical from a railway perspective, with a single siding built to accommodate 40-ft boxcars and along CP's main line.  It also had a store attached to it.  I would find out later that what set it apart from western province elevators was it's concrete base. It will come as no surprise that this was the first elevator I built, using a Campbell kit as my base. I was moderately pleased with the results, and learned that casting plaster walls was difficult when it came time to join them together as well as join them to a wooden structure. I also did not have the skill to properly create weather, wooden shingles, so I improvised and used a commercially available roofing shingle product as a substitute. The elevator no longer resides on the layout, since I could not find sufficient detailed photos which would allow to build the adjacent store.

Original construction including the store; date unknown

Current condition of the Pontypool elevator
Pontypool Elevator looking east

My next elevator is part of a Freemo module that I purchased from a gentlemen's estate in Michigan. The module consisted of a gas station, residential house, and small country elevator. A lot of items compressed into a 2ftx4ft area. The elevator was a Walthers Farmers Co-Op elevator kit, which I added details to and changed some of the scenery elements.  

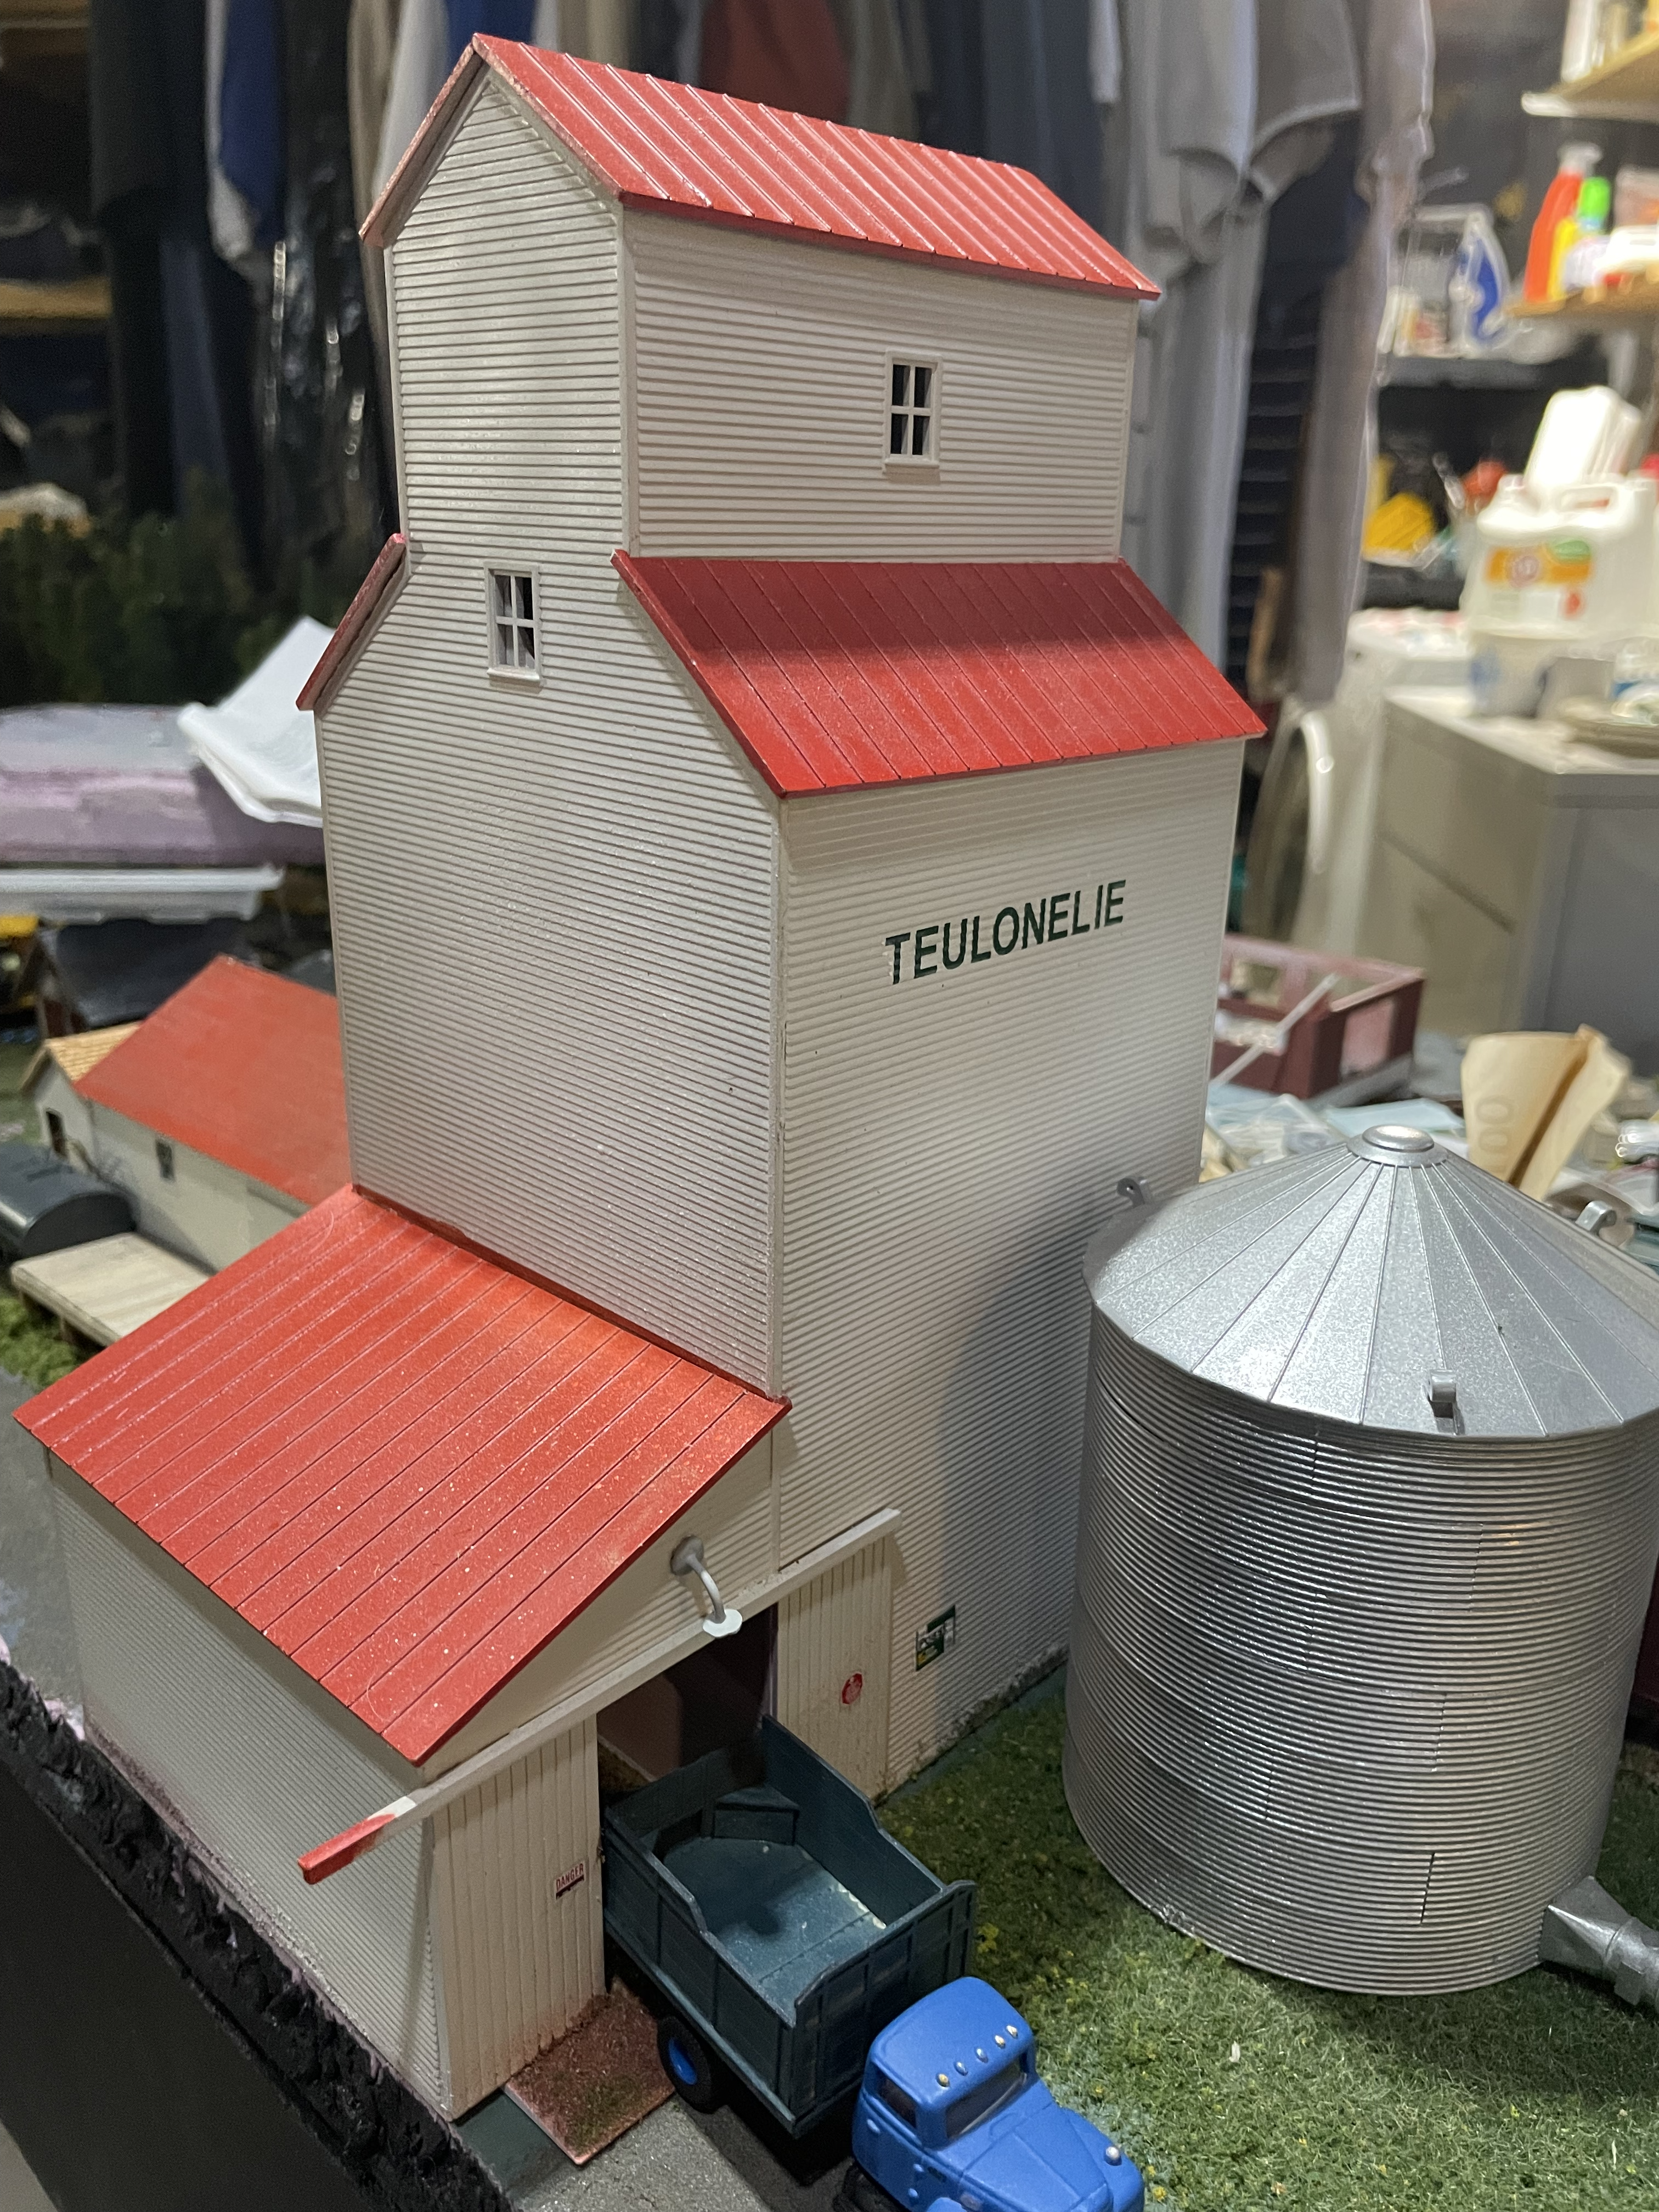
I then built a 2ft by 4ft Freemo module to hold the fictional town of Teulonlie, Ontario. The town consists primarily of a small elevator and feed store, as well as a number of small wooden structures that I have built from various kits. It also houses my scratch built train station.  The elevator will accommodate two 40-ft boxcars or one modern cylindrical or 4750 cu ft hopper.


Part 2 of this series will discuss my recent projects, both of which are under construction and be a major scene on the layout.


Monday, November 21, 2022

OCR Progress Update

As some of you know, I'm lucky enough to be part of the scenery crew for my friend Bram Bailey's Ontario Central Railway. Bram and I share a common interest in Ontario railroading, especially the Ontario Northland Railway. Most of the crew heads to Bram's every Wednesday evening and some Saturdays to work on the layout. However, I live about an hour east, so rather than drive all those miles for each work session I focus on building structures at my work bench. Bram provides me a box of goodies, consisting of kits and other supplies, plus a template of the space available.  I have pretty much free choice on what I can do, such as kit bashing, paint colors, weathering, details and creating signage for business or structure.  So building usually starts with a few hours of research to see what sort of modifications I feel may be needed and to get an idea of paint schemes based on the prototype.  All of which gets documents in my OCR notebook. Then it's off to the work bench. As building progresses, I check each structure against the plan and clarify any questions with the Superintendent of the OCR. Once completed, I return the structure and the scenery crew then creates the final scene down the road.  I keep most of the leftover parts in case they are needed for future builds as you never know what may look good on another stock kit

Here are some recent examples of completed kits. 

Groner's Grain Elevator is named for a friend of Bram's who's vocation is that of a farmer. It is located at Elizabeth Bay.
Tryon Lumber is named for Bram's uncle Reg Tryon, who lived in Bracebridge, ON and worked most of his career in the lumber industry.

Zabrecky Fuel is a Husky Fuel and Propane distributor named after some of Bram's friends.

Sunday, November 21, 2021

Working outside the Home Road

Many of us have helped friends build their own layout in some manner or another. It might be the physical construction, adding scenery elements, or creating rolling stock/engines for them. I was challenged (or maybe just asked) by my fellow ONR modeler Bram Bailey to build Stroebel Enterprises Ltd.  Bram decided to add some interest to the Elizabeth Bay section of the layout by adding an agricultural industry. It is a grain elevator and potato warehouse owned by the Stroebel family. Bram tossed the challenge out to me see if I wanted to build the structures and I of course said yes. Then the challenge was extended to paint the switch engine which will serve the area.


I agreed and a few months ago made the trek to the other side of the Cleveland area to pick up the kits that Bram had for the area. The long brick building in the center is the Potato Warehouse and the white buildings on the right make up the Grain elevator complex. The HQ is a DPM kit that came from the estate of Jim Moore, the spud warehouse is two Columbia feed mills (Walthers 933-9030) bashed end to end and the Grain elevator is a Valley Growers Association kit (Walthers 933-3096) built pretty much to its design, but custom finished. The warehouse required a new roof, since the parts supplied by the kit were just about 1/16-in. to small and actually had been made so that the user could score the roof and bend the single roof piece to fit. So a quick dive into the spare parts and styrene box found a few pieces long and thick enough for the job. Placing the new shingles on the roof also proved to be a small challenge as I couldn't get them to adhere to the styrene quickly enough with the long sheets I was using. I tried using painters tape to keep them tacked in place for a few minutes, but even that came with its own problems as several sections peeled away the top of the shingle from the backing paper.  If you look closely enough you can see some darker areas on the roof, which are pieces of sheet metal which the company has used to patch the roof.  The roofline even has some lighting rods installed in case  some thunderclouds roll through the area.  

The HQ building was repainted to match the dark color of the warehouse, and then lightened by adding gray as the mortar and some weathering powders. The warehouse and elevator were also weathered using a variety of colors available from pan pastels.

Last week I decided that sufficient details, weathering and overall progress had been made and I was ready to declare the buildings complete.  As you can see, Bram is knee deep in other projects for the layout, so we unfurled the plastic cover and roughly set them into place. This is on the lower level which is undergoing some scenery addition by his crew.  I'm looking forward to see how the scenery crew finishes the area.

I'm presently in the process of finishing a Key Alco S-2 that will be the Stroebel Enterprises' industrial switcher. Now that I have some primer back in stock, painting the engine will come in the next few weeks. With Bram's layout shut down and no operating sessions until next spring at the earliest, I have plenty of time to paint the engine.  However, Bram has challenged me to design and build the Tryon Lumber complex on his layout.  A few months ago I gave him an extra planning mill from my layout. So after a few discussions, I'm going to tackle the design and build.  So I've been digging into the spec sheets and working on building configurations.  Looks like a good winter project to build all of those structures. 

.

Monday, March 22, 2021

Yard Building

With the pandemic still in full lockdown mode, I finally got the time to build a small yard and retire a small temporary yard I had built years ago.  The new yard is 10 feet long and sits on two modules which are joined together.

As I was planning my new yard, which was to be situated at the end of the layout, I wanted to include some sort of yard office, as well as a freight shed that had been removed from a different part of the layout. Looking at some photos, I realized that I had enough room to make a fairly complete scene by using the Mechanical Building at Englehart as an example. The other side of the track would house my freight shed.

Drone view courtesy Mike Robin

South side of Bldg; scale house in right foreground

South side of Bldg

North and east walls of the Bldg

The build started with a general Pikestuff building kit, with a few extra side panels added and cut down in height to make a lower roofline. Unfortunately I only had photos of 3 sides of the building, and the pandemic cancelled two trips I had planned to get the info. So the west wall is a complete guess.

One detail that I noticed going back through several years of photos was that the roof and building sides have two different shades of blue, as well as downspout configurations. Perhaps due to a building expansion? Matching the weathering condition and color was a real challenge and although not a true match, the result is pleasing to my eye. Maybe I'll try to alter it at some later date.

One of the challenges was to match the various windows and their position on the wall without any true measurements.  Cutting the doors and windows would turn out to be fairly time consuming, as the Pikestuff panels are fairly thick plastic and required a steady hand and many knife blades to cut them all.

The challenge now is to complete the scene in the background by adding all of the details that you see in the upper photo.  I just finished building the small building directly behind the main structure, as well as removed the trucks from an old Athearn 40 foot ONR boxcar which has been parked in the weeds.

The gravel type pavement was created by pouring tile grout to the consistency of a slushy and then drawing it relatively flat and level across the area.   I plan to weather some of the gravel area with pan pastels to give it more of a well worn look.  Now I just have to find or build the suitable ONR service vehicle(s) to park outside of the building.


Monday, January 18, 2021

New Yard

 As I discussed in a previous entry, I had decided that the railroad really needed a much larger yard. The old yard was an afterthought and once I started operating from it, I realized its limitations.  Therefore, after some review, I opted to build two new modules, which totaled 10 ft in length. 

The Yard consists of a 5-track receiving yard using the Micro-Engineering ladder turnout system, a main line, plus two ready tracks for either building a train or taking one apart. So a total of 8 lines.  The last spur on the ladder will be storage for my vans.  Since the yard was planned to connect to an adjacent two-line module, an extra turnout was added to connect all tracks and make the yard accessible from two tracks. I don’t have room to make a ladder on both ends of the yard, which is a limiting factor, but when you’re out of real estate, you're out of luck until you can move into a different house.  Maybe the next house will allow for about a 20ft yard or larger.

After several weeks of laying cork and track, it was finally time to wire it.  Now I don't mind wiring, however, being under the layout night after night can be touch on the body, especially the eye sight.  However, I pressed on and wiring was completed late Saturday evening. Tested each track using several different engines and all was good. The final steps would be weathering the track and adding ballast. Started to weather the track at about 0100 Sunday using the paint pens I had purchased years ago. The plan was to avoid spraying all of the track and just apply some rust or grime to the sides via the pen method.  All good and I got two tracks done before realizing that it was late and I was running out of energy to complete.  Next morning I started to finish the weathering and actually loaded the yard with every caboose or van in Ontario Northland terms that I own, plus about a dozen freight cars.  Success!!! Completed the task by installing some ground throws.


This week I will start on some scenery work. I still need lots of cinder ballast to complete the track work and adjacent areas.  The green foam and sculptamold shown on the left side of the photo will become scrub grass and weeds, as well as some new trees to make a barrier for the module and regular basement storage items.


Saturday, January 9, 2021

Here we grow again !!!

 2020 has been the year of the pandemic, which has seen model railroad show after show cancelled, as well as friends operating sessions put on hold.  However, for those in this hobby it has also allowed more time to work on the layout or build some models, as there just wasn't much out-of-doors socializing going on and working from home became the safest way to avoid the virus.  I took the opportunity to paint and decal various pieces of rolling stock, work on some general scenery and more.

I kept looking at the layout and wondering how I could build a bigger yard as well as add a few more industries.  While I had built a small yard next to my work bench, the optimal word was that it was small and had become a bottleneck for moving traffic.  In my mind it came down to two solutions: 1) build a second level above the island which houses the paper mill and lumber mill (via the addition of a helix) or 2) tear out some areas and build some new modules that would allow a larger yard and possibly some industries. Thus began a review and evaluation of what I really wanted the layout to finally look like, as this is realistically the final time I will be able to expand into basement space used for other purposes. During some recent plumbing problems, I heard the message that my hobby has taken up too much of the basement.  I will say that the plumber seemed to like my railroad, as on his second trip to the house in 6 months he was heard to remark "oh the house with the model trains. I'd like to see them running".

Adding a second level was problematic for two reasons. The first being that I would have to move my island area outward from its position, so that I could add lateral supports to the 2x4 framing that was used to construct them. While I could move the modules and install another set of vertical supports followed by horizontal supports to lay the upper level on, there was a pesky metal column support for the steel beam which supports the house in the way.  The other issue with this modification would be the need to construct of a real estate eating helix.  Using a 30-inch radius, I would easily end up with a helix that was close to 6 ft in diameter. Lots of wasted space there and I have already torn out a helix about 5+ years ago due to its wasted space.  Definitely not high on my priorities to go through the exercise again, although I had saved all of the hardware from the previous helix.. 

Building new modules also came with a few problems. First and foremost would be that the space for the Nephton mine complex would have to be changed.  Actually it turns out that it would be lost. While hated to lose this industry, especially since I have built a fair number of rolling stock to support it, it simply wouldn't fit. So all buildings have been boxed up for its construction in the next version of the layout.

On the plus side, several months after starting my review process, fellow Freemo modeler Tim Moran got in touch and said he had a couple of 45 deg modules that he would be parting with. A quick email and Tim and I were arranging to meet at the local Walmart parking lot complete with our Covid19 masks in and put them into the back of my car. So parts of a previous 2x4ft module were re-built, becoming a new small rural Ontario town complete with grain elevator business, and this new modules spliced between the two 45's. Although still unnamed and in need of some details, a number of wooden buildings have found a new home of the layout.  

Trackage and wiring completed...on to scenery

One step closer, I still needed to build some modules for a new yard.  But wait, nice weather days in November allowed me to do that. Therefore, yard construction will be included in a new blog entry.


Friday, July 24, 2020

Model RR Shows - Let the Buyer Beware

Like many modelers, I often pickup kits at shows from unknown vendors, with the idea that a good deal is a good deal no matter what.  I'll stick the kit on my modeling shelf and decide to build them at a later date.  So it was with a Walthers logging truck that I had purchased years ago, as these kits have become harder to find and have been sold out at the local hobby stores for some time.  Imagine my surprise when I opened the kit, only to find that the cab had already been painted.  Well not a huge problem, I started to look it over and realized that the previous owner had actually substituted a different cab than was present in the original kit.  The first tip off was that the cab was painted and the second that it was actually a solid block of resin and actually a copy of Mack truck cab.  This was not going to be a kit which was easily put together.


The cab on the left is the cab usually provided from the Walthers kit, one that I had previously started and was just at the final assembly stage.  The cab on the right is the solid block of resin I unknowingly purchased, although I do admit that the details of the wipers, air filter, etc are quite good.  It's just the space behind the fenders and inside the cab are solid blocks of resin. Unfortunately I didn't take a photo until starting to remove the area beneath the fenders.

Here's the view after most of the fender area has been cleaned out.  I drilled a series of small diameter holes along the underside of the fender to start the process and then used a 0.25 in bit to remove the large block of material. Afterwards, I sanded the area smooth and then glued a small block of styrene in the middle to hold the wheel axle.  One word of caution. I don't know what type of resin was used but while trying to remove the resin I noticed that I was smelling a very sickly sweet chemical smell and therefore donned my half face respirator to be safe.  I think that during the heat from drilling it released the odor and it was annoying enough that I could smell it even after finishing my work.  Subsequent sanding was done in the out of doors.

While I thought about trying to remove the solid resin inside the cab, I opted that I could never get the walls thin enough to be realistic, and therefore would try another route.  That was to use the separate truck frame and remove the pre-molded seat and dashboard.  So it was back to the Dremel tool, sand paper and chisels.  I'm never going to be totally satisfied with the way this cab looks, so this truck has been sent to the back of the layout in an area which is heavily treed, and enough shows to depict a log truck coming into the saw mill with a load.

So lesson learned. Next time I fully inspect the packages contents even if the package is sealed with some tape. Who knows when this cab was switched.

Pontypool / Cargill Construction

When I decided to change the layout to install a new yard, I ripped out a previous corner that was basically finished with scenery, which is always difficult to do. However, I rationalized that it was basically a corner that was doing nothing for the revenue stream for the railroad and it might actually enough space to add two rural industries.  The first spur was set aside to hold an elevator that I had built years before to mimic the elevator at Pontypool, ON.  The elevator is located along the CP Rail line and is about 25 miles SW of Peterborough. The Pontypool elevator was constructed in 1918, and was unique as the base was constructed from cement while the upper portion was the typical wood construction.  It was also unique in that the sides of the elevator were covered by cedar shakes.  A store and office, which disappeared in the 70's or maybe even before, had historically been present.  You can still see the outline of the building roof where it attached to the elevator if you look hard enough.  Remnants of the foundation can also be found if you take a closer look through the grass and weeds.  The current structure, which has not seen any signs of life for 40+ years actually replaced the original elevator built in 1894.  The original purpose for the Pontypool elevator was to store barley, wheat and oats in the days of horse and buggy. These products where shipped to Toronto and Montreal by CPR train. As the elevator expanded its services, the first power line to Pontypool came to the elevator and later the first diesel generator in the area was added to grind crops for the farmers. As farms expanded and the transportation system improved, farmers were able to store their own grain and have it trucked to larger elevators.  From what I have researched, it was a Parrish & Heimbecker Ltd elevator.
1977, Kawartha Lakes Public Library


While no longer in service since the 70's, this elevator has always a fascination for me due to its construction. I hope someday that some group will restore it before the termites find it.  Several years ago I decided to scratch build the elevator using the plans from Campbell as a general guide.  The hardest part of the build was fabricating molds for each of the cement walls. Some day I'll detail that process.  I also need to change the cedar siding as I used a commercial product and was not thrilled with the results.  Unfortunately after the structure was built, I really didn't have a good place for it on the layout and it was boxed up. So it has been moved many times and sustained some damage since I didn't pack it well enough.

The former trackage and elevator were fit into the corner and at some point in the future I will paint the track into the backdrop.  But for now the modeled area will serve as storage for cars or simply sit empty.


The second addition to this area is a fertilizer supply business.  This was modeled after the Cargill facility in Mount Elgin, Ontario (Mile 7.7 Port Burwell Sub).  While I don't know much about the former operation (Cargill stopped using this building roughly 6-8 years ago), I came across it while railfanning the Ontario Southland and thought it would be interesting to model some day.  I have modified the structure and placed it up in the clay belt of Ontario so the that the ONR can service it.  While I would have liked to model it as is, once I started to draw up plans I realized that I would have to significantly compress it.  So I have ended up with two buildings, but only support one conveyor tower instead of the two the prototype has.   

Conveyor partially completed

Bldg #2 with completed conveyor set in place

My buildings are primarily scratch built, although some of the components have come from the Walthers Saw Mill buildings and a Rix grain system. Building 1 came from a different part of the layout and was repainted to match the Mount Elgin facility. The 2nd building was scratch built, although I had to compress part of it and omit the 2nd elevator. I hope to add the 2nd conveyor in the future, especially since it has the very prominent Cargill logo painted towards the top and I have the conveyor parts.  The roof was the toughest part of the build, as I had to add more supports that I originally thought were necessary and forgot to take into account that the styrene roofing that was purchased had no real strength and buckled and warped enough to make installation difficult.
Completed building (sort of). Amazing how the photo shows me a few errors and omissions that I have yet to address

The Cargill facility is now open for business, as new track has been laid and the building has been set into the scene.  While many details still need to be added to the building and the scene, I'm pleased with the outcome and it's time for this part of the layout to start receiving cars.

Monday, April 15, 2019

Revamped Corners

July 2020 UPDATE - after writing this discussion, I removed this part of the layout to accommodate a new staging yard and several new modules.  The revamped area was started in the Fall of 2020 and I'm happy to say that as of January 2021 the new yard and modules are operational and undergoing the addition of scenery.  See the replacement blogs titled Pontypool/Cargill Construction and New Yard.

The KLR has a total of three 90 degree corners, only one of which is partially hidden by several industries.  When I first designed the layout, I intended to have all of the corners be rounded, however, upon building the first corner (industrial area) and installing the flexible backdrop, I realized that I was going to lose more space than I had planned.  So the decision was made to change the backdrop and have two intersecting backdrops which came together at a 90 deg angle. Not optimal but no loss of track or switching potential.

The other corners however were simply scenery, and I wasn't too worried about the background appearance as I didn't expect anyone to be hanging around these areas.  However, as I wrote about in the Addressing a Lingering Mistake, I ended up changing the track as it exited the old Eel's Creek module, which was actually the lead in to the curve and the back wall of the layout. In order to accommodate the change in track radius, I needed to rip out most of that corner, although I was able to save the portable rock walls that I was using.  However, after the track was fixed and I put some temporary scenery in place, I realized that I was going to need to change the backdrop.

The past several weeks have been spent removing the corner, including my two portable rock walls, in order to complete the scenery. The photo below is what the second corner just a few weeks ago. Boy when I look at now, I really wonder what I was thinking when I built it. Rocks meeting at right angles is just awful and I had intended to draw trees into the background but never got to that part of the project.  I probably should have built the original corner with a flexible backdrop, but alas, I didn't and there's little reason to go back and try to alter that part of the layout. 

90 deg Corner - still adding some rock castings to make the rock wall
Removable rock castings set onto Luann plywood backing - actually a good idea as this were removable and simply rest on the frame of the module
Here's what the revised corner looks like.  You can still see that it's a corner by looking at the surroundings, but it's a little less obvious.  Ground foam clumps are the new tree canopy and the upper level consists of re-purposed furnace filter evergreens. Still need to add more trees to the top but the scene looks at least a little more plausible.  While there's still a seam where the two sheets of backdrop meet, lots of trees will cover this up.


Removed the house in the foreground and opened it up to just scenery

Rock cuts are the old plaster castings reworked into the scene. Still need to color them some more. Clumps of ground fom were used to simulate the tree canopy while the upper level will completely be covered by trees.  Maybe some day I'll work on painting trees into the background.
Still need to add some fencing and possibly a dirt road to support the idea that folks can drive back to the fishing hole.  But that's another project in the works.


Static Grass Applicator

Every now and then, I get the urge to start some serious scenery efforts.  I've been borrowing my friend Lee's static grass applicator for several projects and really liked the results I've been getting. I liked it so much that when I saw a review for a new and slightly less expensive applicator being made by WWS, a British firm, I did some research and eventually bought one.  It appears that the applicator is also sold under the Peco name as the Scene PSG-1 Pro Grass Micro Applicator. I liked that the unit is slightly smaller than the Noch unit (which seems to have been the gold standard for many years), but has a much more durable feel than the strainer model sold by companies such as MicroMark. I don't doubt that the strainer type of applicator is good, it just feels a lot less substantial than the others.

So I started to lay some grass on portions of the paper mill, as well as ripping out some previously installed ground foam adjacent to the main line as it approached the paper mill. While I still have much more scenery to go, I'm very pleased with the initial results.

I started the process much the same as any area that I cover with ground foam. A latex paint (green base) was installed and allowed to thoroughly dry before coming back with the status grass. I started the first layer with the short, 2 mm static grass to give a short base coat to all of the area. I typically use some diluted matte medium or 50/50 solution of Elmer's white glue to provide the adhesion. I then followed up with an application of 4 mm high static grass, which was a slightly different color than the base coat. I should add that the base coat was a late summer/fall blend that is available in bulk from Scenic Express. All subsequent layers were also fall grass colors, however, they are sold under the Heki ?? name.

Monday, January 14, 2019

Preventative Maintenance

How many of us actually have and implement a preventative maintenance program for our railroad?  I know I have one, as my using the Easy Model Railroading software reminds me that I have entered some dates periodically.  But have I really implemented a PM system?  For those who know me, I work in the chemicals business, where PM systems are taking very seriously as part of maintaining equipment operational and ultimately quality control.

So one of my winter projects was to drag out all of my tank cars, and start performing PM activities on them.  Of course this morphed into adding some weathering efforts and deciding what to do with several of those pesky duplicate tank cars. With a trip to several hobby stores and swap meets in the plans, I ended up with enough new decal sets that I was able to repaint and re-letter all of my duplicates.  So I know have six brand new tank cars available for operations.

What about the weathering?  Well that work will take a little bit more effort, but I have been weathering wheels, trucks and axles as I can.  To date, approximately 1/3 of my 32 available tank cars have had weathering applied this month and I really will try to get the remaining done in the weeks to come.

At the same as I complete the weathering efforts, I have inspected all of the fittings, wheels, trucks, etc and made repair efforts.  Again I anticipate having all of these efforts completed in the next 3-4 weeks.  Not a bad start, but then I look at all of the remaining 120+ pieces of rolling stock and realize that I really need to start a more periodic and routine PM program.  

Tuesday, December 18, 2018

Adding Wood Chip Gondolas to the Roster


New Additions to the Layout

Woodchips are generated by lumber mills and separate purpose built woodchip mills in many areas of the U.S. and Canada. Most are used in paper or cardboard manufacture. While I have a paper mill on my layout, I chose not to model the wood chip portion due o space constraints.  Currently wood chips are received at the mill in the Yard and the loads removed after a set number of days before being returned to the yard as empty's.  Wood chips are received from either an off-site source, or from the Muskoka saw mill (on the layout).  As I discussed in another blog entry, I currently have four wood chip car resin kits manufactured by Alpine Railway Shops of Kettleby, Ontario, which were marketed as being representative of rolling stock used by CN and BCR for saw mills and paper mills. I have several additional car kits which are modeled after the BNSF cars to also handle chips.

A common variation of CP’s woodchip gondolas rebuilt from a 52′ gondola with extended sides.  Bill Grandin photo.

I recently found myself with three 52' gondola kits which I have tried to sell at several railroad shows, but unfortunately no takers. So rather then seeing them sit for months until the next show, I decided to try my hand at kitbashing these kits to resemble a photo I had seen of a CP rebuilt gondola that was placed into wood chip service. These would become lettered in the ONR, although to the best of my knowledge the ONR never had any cars that even approached this configuration.

From what I have been able to research, in the 1970's, CP Rail began to convert some randomly selected old boxcars to woodchip cars; this was done through the early 1980s.  These cars were made by cutting away the old roof and adding an extension. Later cars did not receive the extensions to the sides.  They also took an unknown number of 52' gondolas and extended the sides.

The story for my cars is that CP rebuilt these wood chip gondolas with extended sides from a standard gondola.  After some years of use in the north, CP parked them on a siding for lack of use.  The ONR then purchased them and repainted them to a woodchip only service marks that you see.
Proto 2000 Gondolas getting ready for conversion


Adding bracing for wall extensions. I didn't like the looks of this so the other two cars were done by adding bar stock

No matter how carefully you cut, there are always gaps. Next step some sanding followed by painting


Finished product in chevron scheme
Finished gon in the progressive paint scheme and added Wood Chip Service Only. Note I carried all of the ribs forward on this car after realizing that the gon looked odd with only alternating ribs. Still need to make a load for this unit