Wednesday, December 30, 2015

Historical Sources of Information - NE Ohio

One of the tremendous resources offered by the Internet is the wide variety of historical information that it contains.  From searching for historical photos of a building, to finding old fire insurance maps showing building and property layouts to listings of businesses in city directories, the possibilities seem to be endless.  I would like to share with you a website that I found while searching for historical maps of the downtown Cleveland area.   Stephen Titchenal maintains a website which provides high-resolution digital images of historic maps and documents, many of which also can be seen in places such as the Cleveland Public Library. The website has a lot to offer anyone interested in the history of Cleveland and northeastern Ohio, as well as Ohio railroading in general. Included in the website are many straight line track diagrams (Grade Profiles), locomotive, car, and building diagrams, railroad property/valuation maps, timetables, historical topographic maps, and a small assortment of pictures (taken from the Cleveland Press and Cleveland State University collections). Most of the items found on his site will be helpful in understanding and modeling specific railroad lines in and around Cleveland, as well as northeastern Ohio. For example, he has posted timetables (both employee as well as passenger) for various railroads including the New York Central, Pennsylvania, and the Pittsburgh & Lake Erie. Track diagrams include the Baltimore & Ohio, CCC&StL system track chart, Conrail, N&W, Nickel Plate, Penn Central, PRR, and W&LE.

The site also offers such unique items as the 1884 coal field maps of Ohio, the New York Central System ICC Valuation Map Indexes as well as valuation maps of the NKP.  Many of the digital images on the site have high resolution versions, however you will need to download and install a free DjVu browser plug-in. DjVu provides greater detail and faster viewing than typical web-based images.

The website can be found at: http://www.railsandtrails.com/default.htm

Monday, December 28, 2015

Adding the Unimin Mine (Nephton, Ontario) - Part 1

Geology 101 vs Model Railroading

I needed to take a break from the efforts of wiring, track work, etc on the paper mill modules before I tackled wiring the last island of the layout, so I decided to take a few days off and begin building my background for the Unimin mine area.  Unimin does open pit mining at its Blue Mountain facility, and while trying to model the open pit is impossible, I opted to model just a small portion of the mine, in the area where the mine trucks would be coming up and out from the mine.  While the area I have for the mine is fairly small and compressed, I really just wanted to give a sense of the mining operation and show trucks coming to the processing buildings.  As of summer 2015, the Blue Mountain open pit mine has been mined down to the 8th bench level, and mine officials project that there is at least another 25 years of ore remaining.
Blue Mountain Mine - Unimin
Initial base layer at the end of the new Unimin island of the layout
Now as someone who has a degree in Geology, I wanted the mine walls to show a level of creditability and really capture a rock face like you would see in an open pit.  Fortunately I was able to get some photos of the Blue Mountain pit and use them as a general guide.  However, I knew that I would be restricted in what I could model by both the areal size and vertical depth of the mine.  So my mine had to bend the physical reality a huge amount and have the haul road coming from only two bench levels, and telling visitors that the mine actually extends out into the aisle way.

So the first step involved cutting and attaching the base to the existing foam board. While I started with a 2" thick layer, I opted to cut that in half in order to have a rough surface.  The roadway cut into a 2" block also seemed to be out of perspective, so out came the cross saw and I carefully cut it in half.  Once this was done and glued to the base, it was time to start cutting the back pieces of foam to shape, gluing them together and then gluing them to the mine floor.  I tried to keep the same hillside profile by tracing the largest piece onto the smaller piece and then free handing the contour approximately 1" below the traced line.
Adding 3-D relief/base to the rock wall

Now comes the fun part, getting all those rock castings that I have made to fit into the designated spots, giving the impression of a hillside which has been actively mined yet still follows the fractures and joint patterns of the local igneous rocks of the mine.  While you can use large commercial castings, I prefer to cast rocks using a combination of commercially available molds and home made castings followed by large amounts of breaking castings into small pieces as well as cutting castings into small rock junks.  One of the keys to success is having enough rock castings available to you, as invariably you will find that your running out of castings or need a coasting that you already used for a certain space.  While casting is a relatively slow process, I have found that setting a number of "wet" castings onto a cookie sheet and baking them in the oven for about 60-90 minutes will greatly speed up the process. A "wet" casting is one where the casting has gone through the initial setup and can be removed from the mold, however, is far to wet to accept hot glue to place it on the layout. Of course, if you're going to dry castings in an oven, best to lay the "wet" castings on a piece of aluminum foil rather than upset your spouse by placing them directly onto the cookie sheet.

Fitting them against the hillside is done by the trial and error method.
Rock castings applied with hot glue
Before I actually glue them in place, I test fit them and then lay them aside until enough of the hillside is ready for gluing. Once the pieces are in place, you'll notice that you may have large gaps or cracks present.  The cracks may or may not require attention, as remember that rocks naturally have cracks or joints present as they have been altered by weathering and other processes.  Filling large gaps is easy enough, I simply mix some hydrocal into a fairly stiff mix (e.g. consistency like toothpaste) and force it into the spaces with my modeling or sculpting knife.  In many areas, I'll simply use my fingers to force the hydrocal into the gaps, making sure to get as little on the mold and obscure any details.  Since the molds are also made with hydrocal, there is no real difference in the coloring or how well the material will take the stain that we're going to use.  If you made your castings from plaster of paris, I'd suggest using the same materials too achieve that consistency.  One word of caution...try mixing small amounts of hydrocal, as the material sets fairly quickly (even when mixed with cold water) and working it into the gaps in a series of steps.  Too much materials mixed together will dry quickly, leaving you with firm hydrocal, which just has to be used as rock talus or thrown out.  For the area you see before you, I mixed 4 separate portions and applied them in small areas. After drying overnight, I'll come back with a knife and carve some additional fractures or alter the rock face to make it more blocky, giving the appearance of rock that has been blasted away or removed.
Upper rock face completed

Final result before adding the lower level and coloring the castings
The final step will be to add some additional Sculptamold to the top of the hillside, and add some tinting or coloring to the castings (to be covered in the next entry).

Thursday, December 24, 2015

More Changes to the KLR

With the Fall/Winter months upon us, it's time to retreat to the basement again and begin work on the KLR.  Over the summer months and after the ONR convention open house, I sat down again and sketched a few changes for areas or trackage that I wasn't happy with.  This was to become my work list for the fall season as time permitted.  Look for details regarding these changes in blogs to come.

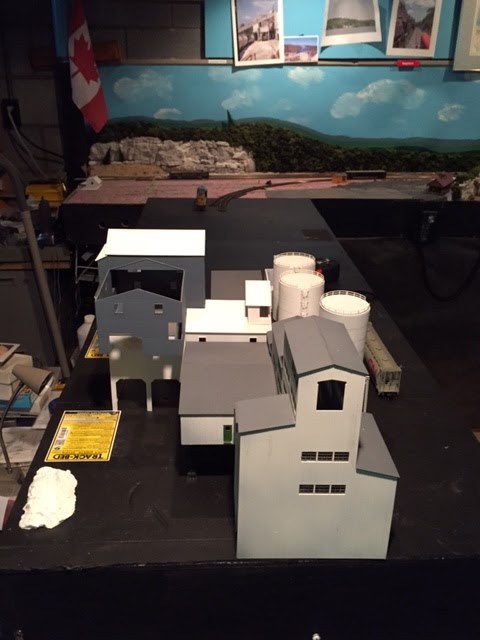
The first two items to change on the layout was the position and buildings of the Unimin mine at Nephton/Blue Mountain.  I had a chance to tour the open pit mine and talk with some of the employees this summer, which really helped me understand the traffic pattern and rail operations for the mine, as well as get some shots of buildings that I was missing.  The new photos really helped with the layout of the buildings and track, as my previous trip to the mine some 10 years ago made me realize that I truly didn't understand how some of the loading of ore was accomplished.

During this time, I also came to realize that the layout needed a small staging yard.  While I used to have a yard in a previous version of the KLR, I abandoned it in favor of a larger paper mill complex and a forest products business.  Probably a mistake in judgement but its done and there was no way I was going to get rid of my paper mill.  So a new "island" was born, which features the Unimin mine on one side of the divide and a small yard on the other side.  Eventually the end of the yard will be connected to a removable bridge, which will allow traffic to enter from the lumber storage business module, as well as allow two way traffic in and out of the yard.

As of late December, the new staging yard is in, basically wired and has been tested by running several trains.  Most of the trackage for the Unimin complex is also installed, although I have fallen behind with my wiring. Hopefully this gets done during the holiday season.

The next change was the total removal of the Cherny farm module, as well as a future hydroelectric dam module that I was thinking of building.  All of the pieces of the farm have been relocated to some space that became available with the movement of the Unimin mine buildings.  All that's ;eft is to re-scenic the area with grasses, trees, fences, etc.  Hopefully a job that can be done in an evening or two.

Thursday, November 26, 2015

System Map


When I began to develop the idea of modeling in southern to central Ontario, one of the key questions was what would a system map look like and how much area would I be able to realistically be able to cover in the space allotted me and keeping within my modular system.  My largest worry was that I would have no problems filling the layout with too many industries and not enough scenery, and that the layout would appear to have a very cramped feeling.

While my first ideas for a system map were actually drawn out on a Ontario Provincial road map, as Google has offered more services, I opted to convert my system map to an electronic version.  The system map has information embedded into each location, which supplements my KLR history, and allows a quick glance at prominent industries along the line.  I have also added the general ONR, CN and CP tracks as reference, and ultimately, more information about these lines will also be added.

Kawartha Lakes Railway System Map

Monday, November 9, 2015

Model Railroad Open Houses

One of the more unique facets of this hobby is how people will open their homes to perfect strangers  so that they can show off their modeling talents as well as progress building a model railroad. This has become an annual occurrence in northeast Ohio, as well as other parts of the US, during the month of November. Within our local area, we are lucky enough to have two Divisions of the NMRA as well as several independent clubs, partake in layout visits. This past weekend, Division 4 had four layouts open in the areas south of Cleveland, and I was lucky enough to get to get all those fall chores, such as gutter cleaning and leaf raking, done so that I could visit each location.  It also didn't hurt that the day was a mixture of sun and clouds, as well as cooler autumn temperatures, making nice conditions for a drive in the countryside. 

The first stop was the Allegheny and Northern, a layout created by Dave Bitte. The HO scale Allegheny & Northern is a free-lanced, short line railroad located in central-eastern West Virginia during the summer of 1965. The unique aspect to this layout is viewing everything through a series of openings in the valance, which runs from the ceiling to below the operating level, making each scene appear like a museum diorama. The backdrops are also sensational. The RR supports branch lines, interchanges and multiple on-line industries to keep a crew of 7-8 busy.


Upper and lower valence


Diorama view of part of the layout, the upper and lower valence easily trick you into thinking that these are rolling hills within WVa

My next stop was to Jerry Kreuger’s basement, where he is in the process of modeling central Illinois in the late 60s to the early 80s. This double deck layout is currently under construction, although both levels have been built and connected by a massive, two track helix. The lower level is primarily staging and classification yard/engine facility. 


Third stop of the day was Aaron Dupont's USS-Acme Steel layout.  This is a switching layout loosely modeling the Chicago area. Main industry is USS-Acme Steel featuring three blast furnaces, basic oxygen furnace, rolling mills, sintering plant and all the necessary support buildings. Also non-steel related switching area representing the Calumet River area. Continuous running loop around 22' by 50' basement featuring 50 car trains.


Entire layout is devoted to switching this massive steel mill; requires 5 operators

Last stop for the day was the Union Valley Central RR, built by John Puch.  This is a double loop HO scale layout based on small towns in Ohio and Pennsylvania. It also features an operating coal mine, power plant with coal dumper, beer factory, interchange track and small yard.


Nice two-room layout with lots of running and great scenery

A great day of model railfanning and thanks to all for opening up their layouts.

Saturday, September 5, 2015

Yard Derailment

A recent occurrence on CP's Havelock Yard while I was on vacation a few weeks ago got me thinking about how a similar occurrence during an operating session on the KLR should be handled.  The background was that some tracks separated as CP was moving loaded railcars out from the loading area and towards a staging track.  Two short hoppers loaded with roofing pellets ended up with wheels on the ground as the rail moved from the old ties.  Actually surprising that this isn't a more common occurrence for this yard, given the worn ties and track nails that get a bite into the wood anymore.  But that's another story.

The derailment took several days to get the tracks back into working condition, as CP had to call in Hulcher Canada to pickup the loaded cars and place them on a good piece or track, before removing the offending ties and replacing them with newer ties.  This resulted in the track being out of service for several days, as well as a delay in shipping the railcars to the customer and isolating this track from moving empty cars to the loader. 


Two car derailment at CP's Havelock Yard, Aug 201  OK I know most everyone strives for "bulletproof" trackwork on the layout.  However, no matter how good the track and cars are, at some point an operator will place something on the ground.  Should you allow the 5-finger MOW to do it's job, or should you take it as a real event and realize that time will be lost and cars will have to be re-routed and/or delayed while the situation is corrected.  It is prototypical to a point, so why not handle it the way the prototype does?  Now not every railroad will have a wreck train, which is true for the KLR.  So I have chosen to handle it a different way, that is by assigning a time penalty to the track as well as a penalty to the crew. Now before anyone goes crazy with that last statement, let me explain what I mean by it.  On the KLR, the offending crew has to go through a drug test (similar to the prototype) and they are relieved of duty and placed down at the end of the crew board and must wait for another train. 

The track is given a time penalty as well, depending on the severity of the incident. Most incidents result in a loss of that piece of track for a minimum of a day.  Of course, this adds to the yardmasters headache and stress level, as they have to figure out how to  dispatch around the blocked trackage.  One or 2 cars can usually be handled by the road crew but more than that may require more man power and extended loss of the track.  Got shipments or passenger trains that need to be on time, better hurry that MOW.

Monday, July 27, 2015

KLR Video - Layout ver. July 26, 2015

Patience, this may take a few moments to load the file...sorry but the video is the sharpest but was done just to provide a general overview to go with the photos. Sorry no sound narration either.


Friday, July 24, 2015

ONRH&TS Convention Time

Here are additional photos of the layout, albeit a little later than my intended timeline

 Commonwealth Plywood
 View of the KLR upon entering the basement

 Pembroke aisle, featuring Commonwealth Plywood and Beaver Lumber

 Muskoka Timber module

 Main street of Pembroke under construction. A new station is coming in the upper left corner of the photo.

 Niagara Distribution module

 Rough in of the Unimin mine module. Future plans may see this module relocated to another spot.

 Nephton countryside

 Corner module

 ONR 1737 crossing Eels Creek module

 Farm #2 module

 Paper Mill (warehouse and engine shop under construction)

 Paper Mill module 1
Paper Mill module 2
View of the NW corner modules.  Farm in the foreground, Comenico Fertilizer and station on the left central part of photo.

 Quaker Oats & Canada Malting Company Ltd. corner
 Quaker Oats & Canada Malting Company Ltd.
Sherwin Williams Paint plant under construction

Wednesday, July 15, 2015

ONRH&TS Convention Preview - Part 2

Pembroke is the home of several forest products businesses, including Commonwealth Plywood, MacMillan Bathurst Inc (corrugated containers), and Temple Inland(Medium Density Fibreboard). While not all of these industries are modeled due to space limitations, the KLR does service the Commonwealth Plywood facility. 

Here we see a few scenes from the downtown area as well as the siding for Commonwealth Plywood.

 True North Climbing Center & Sam's Bike Shop - named for my sons

Commonwealth Plywood

Royal Bank and RedTail Paddle Co.

ONRH&TS Convention Preview Part 1

I opted to preview parts of the layout for convention attendees.  Here's the first of the businesses found on the KLR.

Quaker Oats Company of Canada Limited- The Quaker Oatsplant in Peterborough produces cases of cereal and cake mixes at their facility. Raw materials, including various grains, oils, are transported to the facility by rail. It is quite common to see the yard filled with colorful grain hoppers of different sizes. Finished goods are transported by boxcar or truck.

A Beaver Lumber yard is also present in the town of Pembroke. I think that the old style Thrall all-door box cars were a really interesting design of rolling stock, so I took some modeling license and incorporated a business which could readily use this type of car to transport finished goods. 


Wednesday, July 8, 2015

Another Forest Products Industry for the KLR


I'm fortunate that my job allows me to travel to some interesting locations within North America. So whenever I'm traveling, I can usually be found toting a camera in hopes of finding a train, or at the very least, an interesting business to photograph. If the business is supported by rail, so much the better.
While working in Shawinigan, Quebec (approximately 90 miles SW of Quebec City), I came across an interesting forest products company operating under the name of Commonwealth Plywood Company (or Compagnie Commonwealth Plywood Ltée for any French readers). A review of their business on the web suggested that they were producers of lumber, plywood, millwork and wood panels. Now I don’t know if they do all of the above at this location, but I thought the buildings would make a great addition to my layout for several reasons. First and foremost was that all the buildings were all painted a bright red color. As you look down the street, all you could see was a very red building.  Always interesting to bring something to stand out on the layout.  The other aspect that peaked my interest was that they had a relatively small wood yard, complete with sorting table, truck mounted log loader and plenty of log piles being sprayed with water. Lots of interesting details that I wanted to capture and would fit into the layout.  While the operation was not directly supported by rail at this location, I was able to find that their Pembroke, Ontario location does have rail present.  So a little prototypical transformation and the industry now finds a home on the KLR.

Most of the buildings were scratch built, using sheet styrene and left over parts from other structures. I wasn't trying to model the scene exactly as it is present in Shawinigan, rather, my focus was to get the essence of the industry and fill in with some of the site specific details. The main factor was to have another business that requires the railroad to get their goods to the customer.  The roof lines are drastically different in my model, and I also opted to add some truck bays for the large height building. Of course, the biggest change is that I added rail loading doors in the far building, when there are none at the Shawinigan complex. Although you can't see it in the photo, future plans will have the right side of the photo becoming the yard area. Maybe some time in the future I will decide to model it truer to the prototype. However, at this time, it's an active business for the KLR.
Modeled Area


Prototype, Shawinigan, Quebec

Getting Organized

I've spent some time over the last several weeks getting the rails organized and ready for the ONRH&TS convention.  The biggest and best investment was purchasing about a dozen heavy duty plastic totes. I opted to use two sizes for the storage of rolling stock and other building and scenic supplies.  Large 18 to 35-gallon totes are used to store large amounts of rolling stock, with each type of rolling stock getting it's own tote. While this may seem like I have a large number of rolling stock, I really don't but you have to remember that rolling stock such as centerbeam flatcars, wood hoppers, etc require a large amount of room and typically can't stored on their ends.  I use the 3-10 gallon totes for those cars which I don't have many pieces.  While not an endorsement, I prefer the Rubbermaid Roughneck totes as they seem to be a heavier duty plastic material and not prone to cracking like some of the cheaper plastic totes available.  A small and large tote can easily be stacked beneath the layout, creating storage space and plenty of room to organize rolling stock for the next operating session.

I built shelving for my paint bottles and small objects in the process of being built or repaired.  This is located just above the work scape and includes a fluorescent lamp mounted to the base.  I also mounted a strip of corkboard immediately below so that I can tack up drawings or building plans, which can be quickly and easily referenced from the work bench.  Also very handy to get the small extras out of the way of the work surface.

The next item was taking some plastic electrical outlet boxes, cutting them to size so that they could be used to hold throttles.  I use the cheapest gang box, which costs about half a buck, and cut off all of the extra plastic which holds the nails, turn them on their side and cut a slot down the center and through to a portion of the base.  A little black spray paint and you have a great throttle holder which is easily screwed onto the layout fascia.

Sunday, June 28, 2015

New "Old" Power for the KLR

During the 2015 Div. 4 Carnival swap meet, I happened to come across a gentlemen who was selling his old PRR collection of engines, many of which were DCC equipped.  While not really in the market for an engine, I did come across a Baldwin S12 manufactured by Stewart Hobbies that caught my eye.  I had been thinking that I needed to back date my roster, so that I had one or two old units sitting around, which still could be used while providing further history to the existence of the KLR.  And while some may think it sacriledge to paint over a Pennsy engine, I did so with no hesitation as these units were common switch engines for a number of railroads.  So with that, the purchase was made, the unit test run and then carefully boxed up as a winter project.  Well here it is June, and the engine still sat in its box with no work applied.  Decals were in hand and I had a paint scheme in my mind. So what was keeping me from working on that engine? Well plenty of track work and other scenery details.

However, this past week I got busy one night and applied the paint and was pleased with the color.  So out came the decals, which decided to fight me along the way.  While I had hot them with some dull coat, they still wanted to curl and tear on me.  So with a little finesse and several sets of KLR (taken from an old Rock Island decal sheet I had picked up for a buck), I was able to get the lettering and numbering in hand.  Add a white strip along the cowling and some white paint on the hand rails, and the new power for the KLR is ready to roll down the tracks.  Here she sits for her maiden run in front of the power house.